最新 Hysteria2 安装教程
最新 Hysteria2 安装教程
Mareep前言
今天上 github 看到 hy2 已经发行正式版了,我决定使用一下。
对比 hy1 来说有什么不同呢?
简单来说,就是重写了一下代码,伪装成 h3,优化了下性能,增强抗封锁能力
具体参考官方文档
本文配置参考:chika
安装
下载服务端配置
需要选择自己的版本,一般来说 x86 就是 amd64 了,arm 自行修改下载版本
版本
1 | curl -Lo /root/hysteria https://github.com/apernet/hysteria/releases/latest/download/hysteria-linux-amd64 && chmod +x /root/hysteria && mv -f /root/hysteria /usr/local/bin |
申请证书
1 | bash <(curl -Ls https://raw.githubusercontent.com/vveg26/myself/main/BashScript/SSLAutoInstall/SSLAutoInstall.sh) |
服务端
创建配置文件
1 | nano /root/hysteria_config.yaml |
修改配置文件并粘贴进去
1 | listen: :443 |
masquerade 是用于伪装的,服务器会像真的网站一样响应 http,具体内容可以看官方文档
设置开机自启
编辑系统服务
1
nano /etc/systemd/system/hysteria.service
复制其中的内容进去
1
2
3
4
5
6
7
8
9
10
11
12
13
14
15
[Unit]
After=network.target nss-lookup.target
[Service]
User=root
WorkingDirectory=/root
CapabilityBoundingSet=CAP_NET_ADMIN CAP_NET_BIND_SERVICE CAP_NET_RAW
AmbientCapabilities=CAP_NET_ADMIN CAP_NET_BIND_SERVICE CAP_NET_RAW
ExecStart=/usr/local/bin/hysteria server -c /root/hysteria_config.yaml --log-level debug
Restart=on-failure
RestartSec=10
LimitNOFILE=infinity
[Install]
WantedBy=multi-user.target启动服务
1
systemctl daemon-reload
启动程序
1
systemctl enable --now hysteria
卸载
1 | systemctl disable --now hysteria && rm -f /usr/local/bin/hysteria /root/hysteria_config.yaml /etc/systemd/system/hysteria.service |
其他信息
| 项目 | |
|---|---|
| 程序 | /usr/local/bin/hysteria |
| 配置 | /root/hysteria_config.yaml |
| 重启 | systemctl restart hysteria |
| 状态 | systemctl status hysteria |
| 查看日志 | journalctl -u hysteria -o cat -e |
| 实时日志 | journalctl -u hysteria -o cat -f |
客户端
1 | server: 3.0.20.121:443 |
由 v2rayN 提供 HTTP SOCKS5 代理,由 v2rayN 提供路由规则
- 下载 Windows 客户端程序 hysteria-windows-amd64.exe,重命名为 hysteria.exe,复制到 v2rayN\bin\hysteria 文件夹。
- 修改客户端配置,修改 hy.pornhug.top 为证书中包含的域名,修改 3.0.20.121 为 VPS 的 IP。
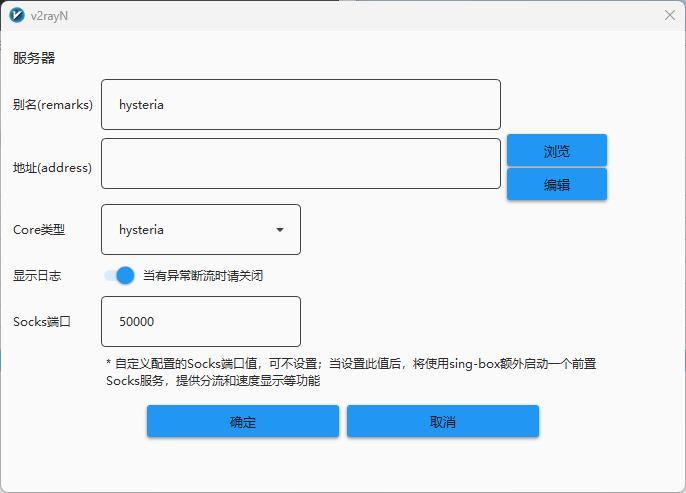
- v2rayN:服务器 ——> 添加自定义配置服务器 ——> 浏览 ——> 选择客户端配置 ——> Core 类型 hysteria ——> Socks 端口 50000

遇到的问题
- Qos 还是比较严重,没有啥改善(可以通过端口跳跃改善,和 hysteria1 方法一样)
- 客户端支持比较少(因为今天才刚出)
开启端口跳跃
未经允许不得转载:测试博客 » 最新 Hysteria2 安装教程

 测试博客
测试博客 通过Nginx反代实现X-ui 面板和宝
 保姆级教程:onekey从注册到充值开卡
 利用CloudFlare Workers
 推荐几个海外虚拟信用卡服务商,可注册Ch
 美国电话卡Ultra Mobile Pa
 xray搭建reality和网站共用44
 使用DDNS-GO配置DDNS,通过cl
 cloudflare的ddns配置


